| 일 | 월 | 화 | 수 | 목 | 금 | 토 |
|---|---|---|---|---|---|---|
| 1 | ||||||
| 2 | 3 | 4 | 5 | 6 | 7 | 8 |
| 9 | 10 | 11 | 12 | 13 | 14 | 15 |
| 16 | 17 | 18 | 19 | 20 | 21 | 22 |
| 23 | 24 | 25 | 26 | 27 | 28 | 29 |
| 30 |
- 2021 정보처리기사
- router 네비게이션
- router go
- vue 로그인
- 중첩 라우트
- vue.js
- 함수형 컴포넌트
- 정처기
- router replace
- 라이프사이클
- React
- 백준 1110 시간 초과
- 2021 정처기
- 클래스형 컴포넌트
- router push
- 2021 정처기 실기
- defaultProps
- Vue.js 시작하기
- Props
- vuex
- propsTypes
- 정보처리기사
- vue.js 로그인
- React 시작하기
- vue 히스토리 모드
- 2021 정보처리기사 실기
- State
- vuex 새로고침
- 컴포넌트
- Vue.js 입문
- Today
- Total
개발 일기
[Vue.js 시작하기] - 컴포넌트 데이터 전달 방법 본문
컴포넌트로 화면을 구성하게 되면 같은 웹페이지라도 데이터를 공유할 수 없다.
이는 컴포넌트마다 고유한 유효 범위를 갖지 때문이다.
그렇다면 데이터 전달을 하려면 어떻게 해야할까?
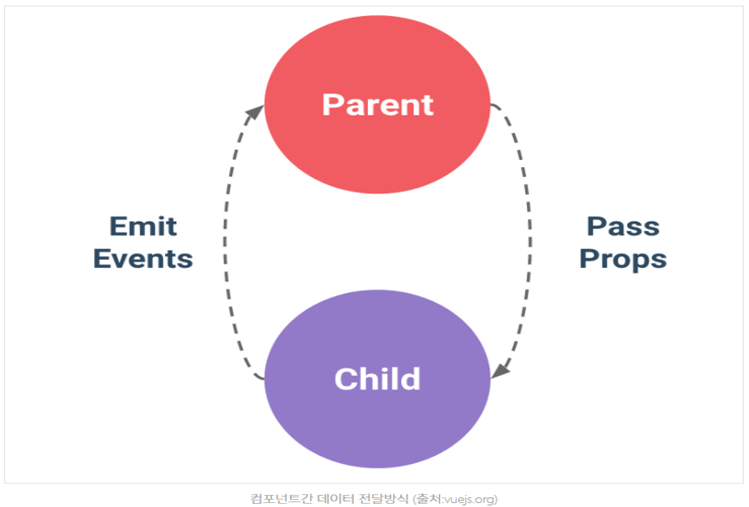
상위-하위 컴포넌트 간의 데이터 전달 방법

우선 상위 - 하위 컴포넌트 간의 데이터 전달 방법이다.
상위 -> 하위 로는 props라는 특별한 속성을 전달하고,
하위 -> 상위 로는 기본적으로 이벤트만 전달 가능하다.
<!--parentComponent.vue-->

<template>
  <div>
    <ChildComponent />
  </div>
</template>

<script>
import ChildComponent from "@/components/childComponent.vue";

export default {
  name: "ParentComponent",
  components: { ChildComponent },
};
</script>
상위-하위 컴포넌트 간의 데이터 전달 방법에 대해 설명하기 위해 ParentComponent에 ChildComponent를
등록한 모습이다.
Root Instance (main.js)
└─ 최상위 컴포넌트 (App.vue)
└─ ParentComponent
└─ ChildComponent
=> 현재 컴포넌트 트리 모습
Props 속성 이용하여 상위 -> 하위 컴포넌트 데이터 전달
상위 컴포넌트에서 버튼을 누르면 하위 컴포넌트에게 상위 컴포넌트의 데이터 값을 알 수 있게 하는 예제를 진행해보겠다.
<!-- parentComponent -->

<template>
  <div>
    하위 컴포넌트에 데이터 값을 알려줍니다.
    <ChildComponent v-bind:childVaule="parentVaule" />
  </div>
</template>

<script>
import ChildComponent from "@/components/childComponent.vue";

export default {
  name: "ParentComponent",
  components: { ChildComponent },
  data: function () {
    return {
      parentVaule: 20,
    };
  },
};
</script>
'v-bind:하단 컴포넌트에서 받을 props 이름'을 사용하여 하단 컴포넌트에서 데이터를 전달 받을 수 있다.
v-bind는 생략 가능하며, ':하단 컴포넌트에서 받을 props 이름'로 사용해도 된다.
<!--childComponent-->

<template>
  <div>{{ this.childVaule }} : 상위 컴포넌트로부터 받아온 값</div>
</template>

<script>
export default {
  name: "ChildComponent",
  props: ["childVaule"],
};
</script>
props에 v-bind에 등록해준 이름을 써주면 하단 컴포넌트에서도 쉽게 사용가능하다.
하위 -> 상위 컴포넌트 데이터 전달
이번에는 하위 컴포넌트에서 버튼을 누르면 상위 컴포넌트의 데이터가 증가하는 예제를 해보겠다.
<!--childComponent-->

<template>
  <button @click="updateParentValue">클릭시 부모의 데이터 값이 증가합니다.</button>
</template>

<script>
export default {
  name: "ChildComponent",
  methods: {
    updateParentValue() {
      this.$emit("childEvent");
    },
  },
};
</script>
버튼을 클릭하면 이벤트를 보내는 메소드가 실행되도록 리스너를 등록했다.
this.$emit("상위에서 받을 이벤트 이름") 을 사용하여 상위 컴포넌트에 이벤트를 보낸다.
<template>
  <div>
    <ChildComponent v-on:childEvent="updateParentValue" />
  </div>
</template>

<script>
import ChildComponent from "@/components/childComponent.vue";

export default {
  name: "ParentComponent",
  components: { ChildComponent },
  data: function () {
    return {
      parentVaule: 20,
    };
  },
  methods: {
    updateParentValue() {
      this.parentVaule++;
      console.log(this.parentVaule) // 21, 22, 22, 누를때마다 증가하는 것 확인 가능
    },
  },
};
</script>
이벤트를 받는 것은 v-on:을 사용하여 받을 수 있다.
이 예제에서는 childEvent 라는 이벤트가 받아진다면 그때 updateParentValue 메소드를 실행하는 것을 알 수 있다.
버튼을 누를때마다 1씩 증가하는 것을 콘솔에서 확인할 수 있었다.
그 밖의 관계를 가진 컴포넌트 간의 데이터 전달 방법
(형제 컴포넌트, 손자컴포넌트)

그렇담 그 밖의 관계를 가진 컴포넌트 간의 데이터 전달은 어떻게 이루어지는 것일까?
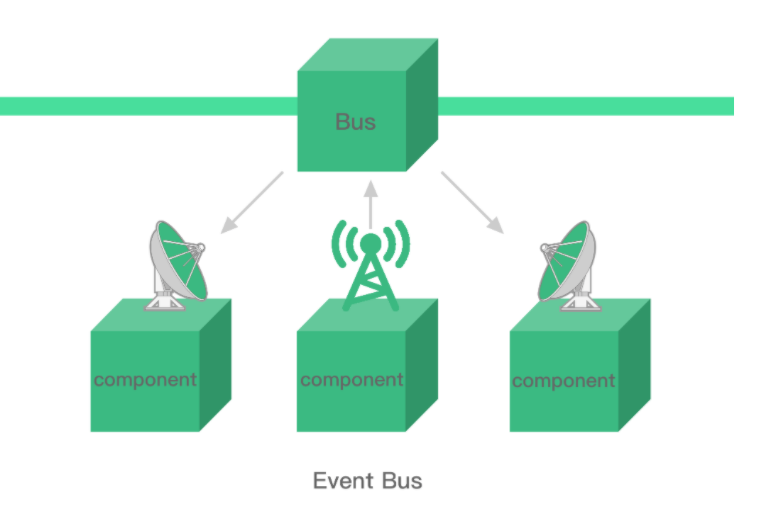
Vue.js에는 이벤트버스 라는 것이 있다.
독립적인 컴포넌트끼리 이벤트를 통신해야할 때 단순히 EventBus를 활용해서 간단하게 처리할 수 있다.
부모 - 자식 컴포넌트가 아닌 관계의 컴포넌트끼리 데이터 통신 예제를 진행하기 위해서
아래와 같은 컴포넌트 트리 구조를 만들었다.
Root Instance (main.js)
└─ 최상위 컴포넌트 (App.vue)
├─ Component A
├─ Component B
└─ Component C
└─ Component D
=> 현재 컴포넌트 트리
아직 컴포넌트 등록 방법이 헷갈린다면
2020/12/20 - [Vue.js] - Vue.js 시작하기 - 인스턴스 & 컴포넌트 를 참고하길 바란다.
Event Bus
관계없는 Component D와 Component C 간 eventBus를 사용하여 서로의 버튼을 클릭하면
버튼에 있는 value alert 창을 띄워보는 예제를 진행해보겠다.
//main.js

import Vue from 'vue'
import App from './App'
import router from './router'

export const eventBus = new Vue()
Vue.config.productionTip = false

/* eslint-disable no-new */
new Vue({
  el: '#app',
  router,
  components: { App },
  template: '<App/>'
})
먼저 Root에서 export const type으로 eventBus를 등록하면 다른 컴포넌트에서
import 를 하여 eventBus를 사용할 수 있다.
<!--ComponentD-->

<template>
  <div>
    {{ this.textComponentD }}
    <button @click="clickComponentDButton">
      {{ this.ComponentDBtnVaule }}
    </button>
  </div>
</template>

<script>
import { eventBus } from "@/main.js";
export default {
  name: "ComponentD",
  data: function () {
    return {
      textComponentD: "ComponentD 입니다.",
      ComponentDBtnVaule: "D의 버튼",
    };
  },
  created() {
    eventBus.$on("clickComponentCButton", (componentCButtonValue) => {
      window.alert(componentCButtonValue);
    });
  },
  beforeDestroy() {
    eventBus.$off("clickComponentCButton");
  },
  methods: {
    clickComponentDButton() {
      eventBus.$emit("clickComponentDButton", this.ComponentDBtnVaule);
    },
  },
};
</script>
<!--ComponentC-->
<template>
<div>
{{ this.textComponentC }}
<button @click="clickComponentCButton">
{{ this.ComponentDBtnVaule }}
</button>
</div>
</template>
<script>
import { eventBus } from "@/main.js";
export default {
name: "ComponentC",
data: function () {
return {
textComponentC: "ComponentC 입니다.",
ComponentDBtnVaule: "C의 버튼",
};
},
created() {
eventBus.$on("clickComponentDButton", (componentCButtonValue) => {
window.alert(componentCButtonValue);
});
},
beforeDestroy() {
eventBus.$off("clickComponentDButton");
},
methods: {
clickComponentCButton() {
eventBus.$emit("clickComponentDButton", this.ComponentDBtnVaule);
},
},
};
</script>각 컴포넌트에서 버튼을 누르게 되면 @click으로 인하여 methods 단에 있는 clickComponentDButton / clickComponentCButton를 호출하게 된다.
그 안에 있는 event.$emit 로 이벤트를 보내게 된다.
이때 첫번째 parameter에 있는 것은 이벤트의 이름이다. 위의 예제에서 함수와 이름이 같지만 달라도 상관없다.
두번째 parameter에 있는 것은 그 이벤트에 같이 보낼 값이다. 물론 값을 보내지 않아도 될 경우에는 보내지 않아도
상관은 없다. ex) 버튼의 눌림 여부만 check 하고 싶을 경우.
created() 안에는 eventBus.$on로 이벤트를 받을 수 있다.
created()는 다음에 설명할 라이프 사이클 훅 중 하나인데,
쉽게말해 컴포넌트가 시작할 시점(created)에 이벤트 받는 것을 항상 on 시켜둔다(eventBus.$on)고 이해하면 될 것같다.
=> off 되기 이전까지 항상 이벤트를 받을 수 있다.
eventBus on 첫번째 parameter는 받을 이벤트의 이름을 의미한다. 앞에서 설명한 event.$emit("A")를 하게 되면
eventBus.$on("A" => (){})로 받게 된다. 두번째는 같이 보내져온 값을 사용하여 콜백 함수를 등록할 수 있다.
위의 예제에서는 보내져온 값을 사용하여 alert 창을 띄운것을 볼 수 있다.
앞서 말했듯 이벤트는 off 되기 이전까지 항상 이벤트를 받을 수 있기 때문에 컴포넌트가 종료(destoryed)된다거나 할때
이벤트를 종료( event.$off("이벤트 이름") ) 시켜주어야한다.
다만, 이벤트버스는 한정된 컴포넌트간의 통신에는 적합하지만 자주 사용하게 된 후,
규모가 커진다면 이벤트 추적 관리에 힘들어지는 단점이 있다.
(이를 관리하기 위해서 vuex 라이브러리를 이용할 수 있다. 이는 이후에 다룰 예정이다.)
'Vue.js' 카테고리의 다른 글
| [Vue.js 시작하기] - Vuetify 로 웹 디자인 하기 (0) | 2021.01.13 |
|---|---|
| [Vue.js 시작하기] - 라이프사이클 (0) | 2021.01.12 |
| [Vue.js 시작하기] - 인스턴스 & 컴포넌트 (0) | 2020.12.20 |
| [Vue.js 시작하기] - Vue.js 설치 (0) | 2020.12.20 |
| [Vue.js 시작하기] - Vue.js 란? (0) | 2020.12.20 |


